You have clients who want length, thickness and a specific style that requires customization. What do you do? Offer them Sew-In Weft extensions! Luckily, Babe Hair has both Hand Tied and Machine Sewn Weft
extensions! To prepare for install, here’s what you need to do.
 Step 1:
 Learn how to install Sew-In Weft extensions from the lead educator at Babe Hair. We offer an in-depth course where you can officially get certified!
Step 2: Get the right tools you need! Tools are necessary to make your client’s hair dreams come true.
Here’s the coveted list of all the things you’ll need to stock up on!- Quick Pick
- Deluxe Tool
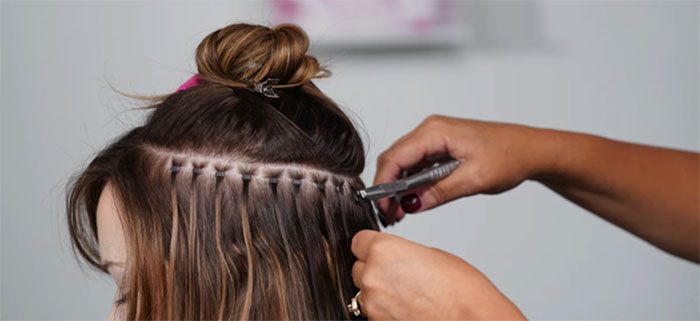
- Weaving Thread
- Stork Shears
- Mini Clips
- Large Clips
- Loop Tool
- Silicone
- Beads
- Weaving Needle
- Weft Adhesive
New to installing wefts? Get the Weft Starter Kit which includes all the needed tools and practice hair!
Want all the tools for installing different types of extensions? Get the Deluxe Kit!
Step 3: Get the Babe Hair Sew-In Weft extensions that fit each person. For finer hair Hand Tied Wefts are the way to go. For medium-coarse to thick hair, you may want to order Machine Sewn Wefts.
Babe Tip: Once you have the skills, tools and hair for installation, keep these tips in mind:
When you preload your loop tool with silicone beads, make sure the bead color matches the client’s natural base.
Pre-thread your needles using a color of thread that matches the client’s natural base.
Generally, you will want to use three-times the length of thread to the length of your row.
Step 4: Plan your time accordingly. Sew-In Weft extensions take approximately two hours to install, and you’ll need 3-4 rows of wefts for a full head.
How to choose the right type of Sew-In Wefts for your clientAlthough the sew-in installation process is similar between Hand Tied and Machine Sewn Weft extensions, each method has its standout qualities. Check them out!
Hand Tied Weft extensions are more appealing for clients with finer hair. Some of its glowing features are:
- handmade with a lightweight design
- comfort with full movement
- customizable with the help of adhesive
- 1-3 wefts can be layered on a row to create the desired fullness and density
Machine Sewn Weft extensions have its perks and is a worthy contender to achieve hair goals, especially for those with medium to thick texture. Its benefits include:
- customizable with no adhesives
- ideal for blending color options
- triple-layered and double-drawn for length and density
- can be easily deconstructed
Depending on your client’s needs and hair type, consider both options to find the right fit.
Installation tips for Sew-In Weft extensionsRemember, it’s never a bad idea to expand your skill set in the salon. Since Sew-In Weft extensions clearly offer a host of benefits, make certification a priority. In the meantime, here are some tips and tricks for installing Sew-In extensions.
Sew-In Weft extensions can be customized to your client’s unique hair color and texture! Peep these Babe Hair Pro Tips!
1. Customize the length of the weft! Machine Sewn Wefts can be cut to match the track of the beads with no gluing necessary. Hand Tied Wefts can be folded if they are too long for the track. If cutting is necessary, make sure to glue the end with Weft Adhesive so there's no unraveling.
2. Blend your wefts! Place one weft underneath the track of beads, and 1-2 wefts on top, so that the track of beads is hidden. This application makes the wefts virtually invisible when they are pulled up! It’s a win-win!
3. Mind the gap! Hand Tied Weft extensions are pre-measured to a certain length and the beaded track should always match. For best practices, leave a finger-space gap in between the beads!
4. Go the original route! For Machine Sewn Wefts, reconstruct the weft like they came in the package. Using a needle and thread, stitch the wefts back together in either a double or triple stack by passing the needle through the sewn part of the weft. Keep the wefts layered, like they come originally, to keep them less bulky at the scalp.
How to care for Sew-In extensionsAll the best things need to be taken care of--and extensions are no different. Here are some tips to share with your clients to help prevent matting and keep the extensions fresh and ready to go!
1. Brush with care. We recommend brushing your hair 2-3 times a day with your Babe Hair Extensions Brush. Gently brush, starting at the ends of the hair and working your way to the top of the weft. Repeat with each row of extensions.
2. Wash with the right products. Look for a professional, sulfate-free shampoo and conditioner when you’re washing your extensions. Avoid washing your hair upside down or piling the locks on top of your head.
3. Moisturize and blow-dry properly. Choose hydrating or moisture-replenishing professional products to keep your extensions moisturized. Before blow-drying, apply a heat protectant. Then, blow-dry in a downward motion to keep your hair smooth and tangle-free.
Babe Tip: It’s best to air-dry your extensions when you’re hanging around the house.
4. Prep for bedtime. Loose braids and ponytails are your friend. Gently secure your hair before bed and rest your head on a silk pillowcase.
Babe Tip: Never go to bed with wet hair. This can cause matting and breakage.